Ads

How to Entries Income and Expenses in Tally Accounting [Part-10] with Video.

Tally.ERP 9 मा आय (Income) र खर्च (Expenses) प्रविष्टि गर्ने विधि

1. आय (Income) प्रविष्टि गर्ने तरिका

नगद आय प्रविष्टि (Cash Income Entry):

  1. Gateway of Tally > Accounting Vouchers > F6 (Receipt)

  2. डेबिट (Dr): Cash Account (नगद खाता)

  3. क्रेडिट (Cr): Income Account (आय खाता, जस्तै: Service Income, Sales, Commission)

  4. रकम भर्नुहोस्

  5. आयको प्रकार (Narration) मा विवरण लेख्नुहोस्

  6. Ctrl+A थिचेर सेभ गर्नुहोस्

उधारो आय प्रविष्टि (Credit Income Entry):

  1. Gateway of Tally > Accounting Vouchers > F7 (Journal)

  2. डेबिट (Dr): Debtor Account (ग्राहकको खाता)

  3. क्रेडिट (Cr): Income Account (आय खाता)

  4. रकम भर्नुहोस्

  5. विवरण लेख्नुहोस्

  6. Ctrl+A थिचेर सेभ गर्नुहोस्

2. खर्च (Expenses) प्रविष्टि गर्ने तरिका

नगद खर्च प्रविष्टि (Cash Expense Entry):

  1. Gateway of Tally > Accounting Vouchers > F5 (Payment)

  2. डेबिट (Dr): Expense Account (खर्च खाता, जस्तै: Rent, Salary, Office Expenses)

  3. क्रेडिट (Cr): Cash Account (नगद खाता)

  4. रकम भर्नुहोस्

  5. खर्चको विवरण लेख्नुहोस्

  6. Ctrl+A थिचेर सेभ गर्नुहोस्

उधारो खर्च प्रविष्टि (Credit Expense Entry):

  1. Gateway of Tally > Accounting Vouchers > F7 (Journal)

  2. डेबिट (Dr): Expense Account (खर्च खाता)

  3. क्रेडिट (Cr): Creditor Account (आपूर्तिकर्ता खाता)

  4. रकम भर्नुहोस्

  5. विवरण लेख्नुहोस्

  6. Ctrl+A थिचेर सेभ गर्नुहोस्

3. आय/खर्च खाता सेटअप गर्ने तरिका

नयाँ आय खाता थप्ने:

  1. Gateway of Tally > Accounts Info > Ledgers > Create

  2. Name: "Service Income" जस्तै नाम राख्नुहोस्

  3. Under: "Income Accounts" छान्नुहोस्

  4. Ctrl+A थिचेर सेभ गर्नुहोस्

नयाँ खर्च खाता थप्ने:

  1. Gateway of Tally > Accounts Info > Ledgers > Create

  2. Name: "Office Expenses" जस्तै नाम राख्नुहोस्

  3. Under: "Expenses" छान्नुहोस्

  4. Ctrl+A थिचेर सेभ गर्नुहोस्

4. महत्वपूर्ण नेपाली टिप्स:

  1. प्राप्ति/भुक्तानी विवरण:

    • आय/खर्चको प्रकार अनुसार विस्तृत विवरण दिनुहोस्

    • Receipt No./Bill No. राख्न नबिर्सनुहोस्

  2. कर सम्बन्धी:

    • TDS लागू हुने खर्चमा TDS सेटअप गर्नुहोस्

    • F12 मा गएर अतिरिक्त कर विवरण थप्न सकिन्छ

  3. रिपोर्ट हेर्ने:

    • Display > Profit & Loss Statement मा आय-खर्चको विवरण हेर्न सकिन्छ

    • Display > Day Book मा दैनिक प्रविष्टिहरू हेर्न सकिन्छ

  4. आय-खर्चको वर्गीकरण:

    • विभिन्न प्रकारका आय-खर्चलाई अलग-अलग खातामा राख्नुहोस्

    • जस्तै: Transportation Expenses, Advertising Expenses आदि

  5. आवधिक प्रविष्टि:

    • मासिक बारम्बार हुने खर्च (जस्तै किराया, तलब) का लागि

    • Gateway of Tally > Accounting Vouchers > F7 (Journal) प्रयोग गर्नुहोस्

  6. प्रिन्ट गर्ने:

    • Alt+P थिचेर कुनै पनि प्रविष्टि प्रिन्ट गर्न सकिन्छ

    • F12 मा गएर प्रिन्ट फरमेट कस्टमाइज गर्न सकिन्छ

याद गर्नुहोस्: प्रत्येक लेनदेन पछि Ctrl+A थिचेर सेभ गर्न नबिर्सनुहोस्। यसले डाटा सुरक्षित गर्न मद्दत गर्छ।

Items of income or expenditure exceeding 1% of the Revenue from operations, or ₹1,00,000 whichever is higher, will be available in Income Disclosure and Expense Disclosure reports.


View Income and Expense Disclosure reports

1. Go to Gateway of Tally Audit & Compliance Financial Statements Profit & Loss A/c .

2. Drill down into the Note Summary of the Income Head Revenue from Operations or Other Income .
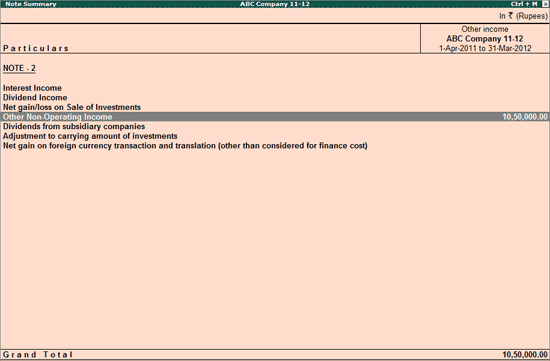
3. Click Ctrl+C Classify Helper or press Ctrl+C . The Income Disclosure report appears as shown below:

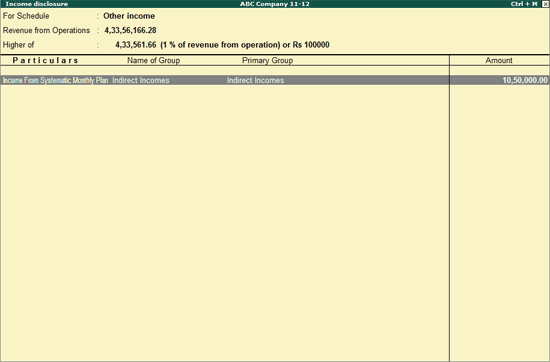
4. Select the required income item and click on Ctrl+Enter Classify or press Ctrl+Enter to set Schedule VI Configuration for the chosen income item.

5. To set Schedule VI Configuration for multiple income items at one go, select the required items using Spacebar and click on Multi Classify or press Alt+C .

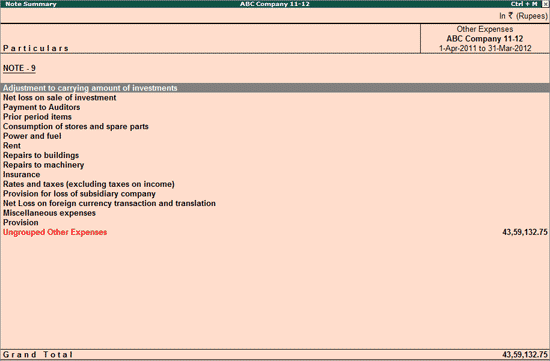
For Expense Disclosure report, drill down into the Note Summary of Other Expenses as shown below:

Click on Ctrl+C Classify Helper or press Ctrl+C .

The Expense Disclosure report appears as shown below:
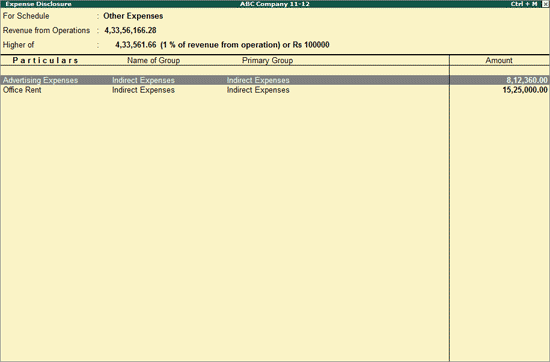
Select the required income item and click on Ctrl+Enter Classify or press Ctrl+Enter to set Schedule VI Configuration for the chosen income item.

To set Schedule VI Configuration for multiple income items at one go, select the required items using Spacebar and click on Multi Classify or press Alt+C .

Button options in Income Disclosure/Expense Disclosure report

● : Show Separate : Select the required Ledgers using Spacebar and click on Show Separate or press Alt+S to display them separately on the face of the Schedule-VI Profit & Loss A/c .

● F9: Inv Reports: Click F9 Inv Reports or press F9 to navigate to the default Inventory Reports like Godown Summary Movement Analysis Stock Summary and so on.

● F10: Acc Reports : Click F10 Acc Reports or press F10 to navigate to the default Accounting Reports like Balance Sheet Cash Flow Trial Balance and so on.

● F10 : Audit Reports : Click F10 Audit Reports or press Alt+F10 to navigate to the other Audit Reports within Statutory Audit .

Configuration Options

Click F12 Configure or press F12 to change the default view of the Schedule VI Master Configuration report:

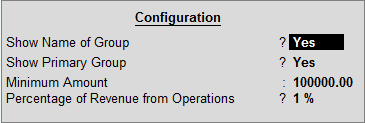
● Show Name of Group : Set this option to Yes if the Ledger has been categorised under Sub-Groups .

● Show Primary Group : Set this option to Yes to view the Primary Accounting Group under which the Ledgers have been classified.

● Minimum Amount : This field will be Rs.100000 by default.

● Percentage of Revenue from Operations : This will be 1% by default.


Tags

Post a Comment

0 Comments
* Please Don't Spam Here. All the Comments are Reviewed by Admin.

#buttons=(Ok, Go it!) #days=(20)

Our website uses cookies to enhance your experience. Learn More
Ok, Go it!