

Watch Video on Sale and Purchase Entry in Tally Accounting Software.
When a company buys goods on credit or cash, Purchase voucher is used to record all the Purchase transactions of the company.
● Go to Gateway of Tally > Accounting Vouchers.
● Click on F9:Purchase on the Button Bar or press F9 .
For example, if you are purchasing goods from Supplier A for a value of Rs. 10000/-
● Debit Purchase Account.
● Credit Party Account.
To pass a Purchase entry in the Invoice mode, you need to enable the option Enable Invoicing in F11: Features (F1: Accounting or F2: Inventory Features) .
Invoice mode is of two types, namely:
● An Account Invoice
● An Item Invoice
Account Invoice: You will be directly selecting/debiting the Ledger account in case you are passing an Account Invoice. This is useful especially when a Service Bill is entered and does not include Inventory.
Pass a purchase Invoice for Service availed from XYZ Couriers.
Item Invoice: You will be first selecting the Inventory and then allocating the same to the relevant Ledger account. This is useful to record all the Inventory movements in books of account.
Pass a Purchase Invoice against purchase of Item A – 100 Nos. @ Rs. 10/= per quantity from LMN & Company.

Configuring an Invoice
Before creating the Purchase Invoice, you can set your I nvoice Configurations from F12 configure:
● Go to Gateway of Tally > Accounting Vouchers > F9: Purchases (As Invoice)
● Select F12 Configure .
● Set the options, as required.
Purchase Invoice Configuration
1. Accept Supplementary Details : Set this option to Yes to specify the Despatch Details. If this option is set to No, Print Default Name and Address of Party will be enabled for configuring. Here it captures the default name and address present in the ledger.
2. Allow separate Buyer and Consignee names : Customers who are into consignment business and would like to have the Consignee details on the Invoice, have to set this option to Yes .
3. Use Common Ledger A/c for Item Allocation : If you would like to allocate all the Items to a single Purchase Ledger in the Invoice, you need to set this option to Yes for faster data entry.
4. Allow Expenses/Fixed Assets for Accounting Allocation : If you want to use Expense or Fixed Assets ledgers while recording a Purchase entry, set this option to Yes .
5. Use Defaults for Bill Allocations : Setting this option to Yes will allocate the Bill Numbers automatically as defined in voucher type master in ascending order.
6. Use Additional Description(s) for Item Name : If you would like to specify any additional description for item during entry, this option has to be enabled.
7. Use Additional Description(s) for Ledger Name : If you would like to specify any additional description for ledger during entry, this option has to be enabled.
8. Consolidate Stock Items with same rates: If you would like to consolidate the stock items having same rates in Invoice, set this option to Yes .
9. Show Compound Unit of Item based on Rate : By enabling this option, you will be allowed to show the compound unit of item based on the unit provided in the Rate Per column . For more details, click here .
10. Show Full Details of Compound Unit : Enabling this option will display full details of compound unit in the Quantity field. For more details, click here .
11. Confirm each Cheque before Print : When you set this option to Yes , a conformation screen will appear for every cheque used for the transaction before it is printed.
12. Use Defaults for Bank Allocation : Setting this option to Yes , the Bank Allocations will have default allocations in which, the Transaction type is Cheque, Voucher date as Instrument Date. the Cheque Range and Cheque Number will be Blank if it is not defined.
13. Use Auto Cheque Numbering : To fetch cheque numbers automatically to the Bank Allocation, set this option to Yes . The first Cheque Range defined for the Bank ledger will be taken as default.
14. Allow Selection of Cheque Ranges : Setting this option to Yes , allows you to select any cheque range defined for a bank.
15. Show Remarks in Bank Allocation Details : A new field - Remarks , will appear in the Bank Allocation screen where you can enter your remarks, when this option is set to Yes .
16. Importer’s Options : This is useful for import transactions.
17. Show turnover achieved with Customer : This option will help to view the turnover details during entry.
18. Allow modification of ALL fields during entry : Default order/delivery note entries appearing in the Invoice can be changed during Invoice entry. Set this option to Yes to permit modification of all fields.
19. Warn on Negative Stock Balance : Tally.ERP 9 will display a warning message Negative Stock with quantity details. You can then check which item is having negative stock balance.
20. Honor Expiry Dates usage for Batches : You can restrict or allow the usage of Expired stocks for selection during entry by configuring this option.
21. Show batches with Zero Quantity : On setting this to Yes the batches with zero quantity will be available for selection during entry.
22. Calculate Tax on current Sub-Total : This option should be enabled if the tax needs to be calculated after considering the additional Expenses.
For more details on Purchase Voucher mode configurations refer Voucher Entry Configuration
Special Keys on the Button Bar
When you are passing an Item Invoice in Invoice mode, the following options will be available in the Button Bar.
Alt+I – Acct Invoice – You can toggle between Item Invoice and Account Invoice, by clicking on this option on the Button Bar or pressing Alt+I or vice-versa.
Ctrl+V – As Voucher – You can toggle between Invoice mode and Voucher mode, by clicking on this option on the Button Bar or pressing Ctrl+V or vice-versa.
Special Keys for Voucher Narration Field
● ALT+R: Recalls the Last narration saved for the first ledger in the voucher, irrespective of the voucher type.
● CTRL+R: Recalls the Last narration saved for a specific voucher type, irrespective of the ledger.
Purchase or sales ledgers are required for trading, repacking or in manufacturing products. Sales and purchase account groups are revenue accounts and are used in the profit and loss account.
1. Go to Gateway of Tally > Accounts Info. > Ledgers > Create .
2. Group it under Purchase Accounts for purchases or Sales Accounts for sales.
3. Select Yes for the option Inventory values are affected? if your company maintains accounts with inventory.
The Ledger Creation screen appears as shown below:

Note: You can link inventory with accounts like customs duty, or direct expenses related to purchases such as freight inwards.
To get the options for cost centre and interest calculation in the Ledger Creation screen, you have to enable the following options in set the option in F11: Features > Accounting Features :
● Set Maintain cost centres to Yes . In the ledger master, set the option Cost centers are applicable? to Yes i f any of the transactions need to be allocated to any particular cost center.
● Set Activate interest calculation to Yes to enable interest calculation automatically based on the interest rate and style of calculation specified.
● Set Use advanced parameters to Yes to enable the advanced parameters for interest rates that change from time to time.
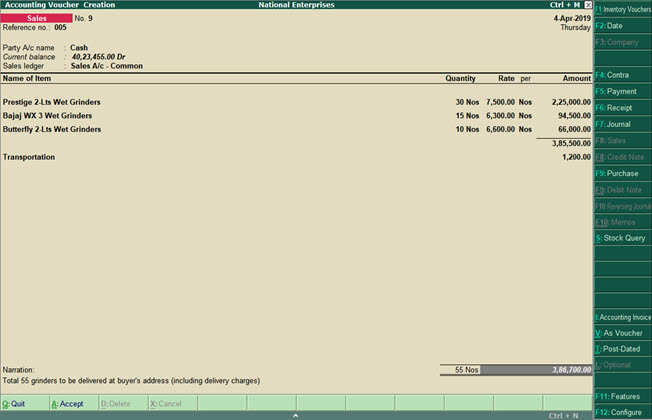
Record Sales of Goods or Services
Whether you do cash sales or credit sales, the procedure in Tally.ERP 9 remains similar. The only difference is that you will select cash or bank for cash sales and party ledger for credit sales. You can record sales of items using the Item Invoice mode and create bills without items using the Accounting Invoice mode. Tally.ERP 9 also provides the flexibility to use these invoice modes interchangeably for recording sales. As per your business practice, you can print all the invoices with the necessary details.
1. Open the sales voucher screen.
a. Gateway of Tally > Accounting Vouchers > F8 (Sales).
b. Press Alt + I and select the invoice mode as per your business needs.
2. Specify the buyer details.
a. Party A/c Name : Select Cash or Bank for cash sales. For credit sales, select the party name.
b. Party Details : If you need Despatch , Order , or Buyer details to be part of your invoice, provide the following details:
If you do not see the Party Details screen, press F12 (Configure), and set Enable supplementary details? to Yes .
o Despatch & Order Details : You can print these details in the invoice for the buyer's reference. If you already have a Delivery Note or a Sales Order, the Delivery Note Number and the Order Number are pre-filled.
o Buyer's Details : In the case of cash sales, specify the buyer's details as needed in the printed invoice.
Note: Your regular customers may need specific details, such as address with landmark, alternative contact number, and so on, to appear in the invoices they receive. In such cases, you can create party ledgers with the required details, such as Address, State, and so on. In the Buyers field, press Alt + M (Party List) and select the required ledger.
As always, you can press Ctrl + A to save and proceed.
3. Specify the accounting ledger to allocate the stock items.
● For Item Invoice , select the Sales ledger .
If you do not see this field on the screen, press F12 (Configure) and set Use common ledger account for item allocation? to Yes . See more...
● For Accounting Invoice , you do not need an accounting ledger since no stock items are involved for allocation.
4. Provide stock item or service details.
As in other transactions, you can create the item or ledger on the fly by pressing Alt + C .
● For Item Invoice , select the stock item, enter the Quantity . The Rate will be auto-filled, if available for the stock item. However, you may choose to enter the Rate or Amount .
● For Accounting Invoice , select the service ledger and enter the Amount .
5. Select additional ledgers, like transportation charges, insurance, or discount, if any.
6. Provide Narration , if needed, and accept the screen. As always, you can press Ctrl + A to save.
Click here to see the possible F12 configurations for Sales Voucher.
7. To print the invoice, press Alt + P (Print) and press Enter .
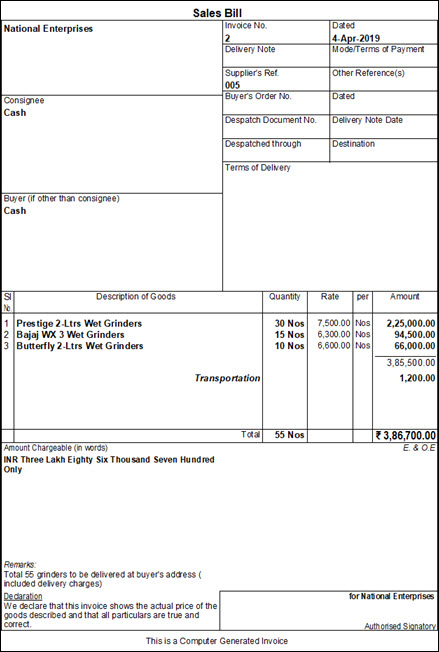
The following is a sample preview screen of the sales invoice.
Print Sales Invoice with Additional Details
When you make a sale, you will need to hand over a printed copy of the invoice. Depending on your business policy or buyers' preferences, you may want to change the title of the invoice, use the company logo, or even set the print size for the invoice. You may need to print your company's bank details, the declaration or terms and conditions of sales, marks or container numbers for exports. Also, you may want to print the invoice as a proforma invoice. Tally.ERP 9 covers all such printing preferences.
In this section
● Change Declaration/Terms & Conditions in Sales Invoice
● Use less paper space to print invoices
● Print Marks or Container Number & Number of Packages
Change invoice title
If you want to change the title, say Sales Invoice to Cash Memo, or even the subtitle of the sales invoice before printing it, you can do so in Tally.ERP 9.
1. In the sales invoice, press Alt + P (Print) > F12 (Configure).
2. In Title of Document , enter the required title. Similarly, in Sub Title (if any) , enter the required subtitle.
3. Accept the screen. As always, you can press Ctrl + A to save.
Henceforth, all the sales invoices that you print will continue to have the same title/subtitle, until you change it in F12 (Configure) for invoice printing.
4. In the Voucher Printing screen, press Enter to print the invoice with the title/subtitle.
The title you have specified will appear on the top of the printed invoice. If you have used a subtitle, it will appear below the title.
