

Watch Video How to Printing Bill or Invoice and Other Statement in Tally Accounting software.
You can print your sales invoices recorded in Tally.ERP 9 by clicking Alt+P in the sales invoice. On the sales invoice, you can customise your print configuration by pressing F12 .
1. Go to Gateway of Tally > Accounting Vouchers > F8: Sales .
2. In the sales invoice, press Alt+P to print the invoice.
3. Press F12 to configure the printing of your sales invoice.
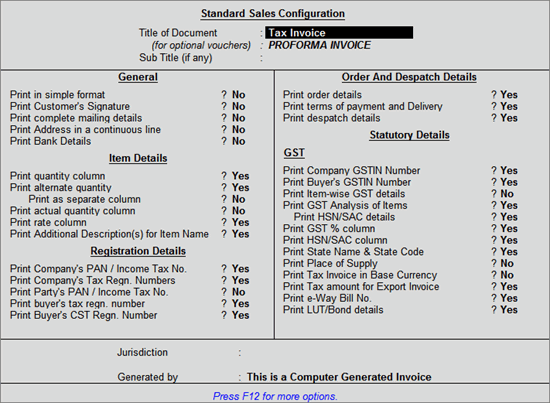
● Print complete mailing details : This will print the buyers’ s contact details such as contact person, contact and e-mail.
● Print Address in a continuous line : This will print the address in a continuous line, even when multiple lines of address is mentioned in the ledger master.
Note: The buyer's and consignee's address will be printed in a continuous line when the option Print Address in a continuous line is set to Yes / No when:
♦ Allow separate buyer and consignee name is enabled in the invoice and
♦ Print complete mailing details is enabled in the print configuration screen.
● Print terms of payment and delivery : This will print the terms of payment mentioned in the Party details screen.
● Print Item-wise GST details : This will print the GST invoice in landscape orientation with tax breakup for each stock item.
● Print GST Analysis of Items : This will print the GST tax analysis in the sales invoice, which will provide details of the tax rate and values.
● Print GST % Column : This will print the GST tax rate in a separate column of the invoice.
● Print HSN/SAC Column : This will print the HSN/SAC code in separate column of the invoice.
● Print MRP/Marginal Column : This will print the MRP mentioned in stock item separate columns in the invoice.
● Print State Name & State Code : This will print the buyer’s State and State code.
● Print Place of Supply : This will print the State (location where supply will be received) under Buyer’s details .
● Print Tax amount for Export Invoice : This will print the IGST charged on exports.
Press F12 again to view Advanced Sales Configuration :
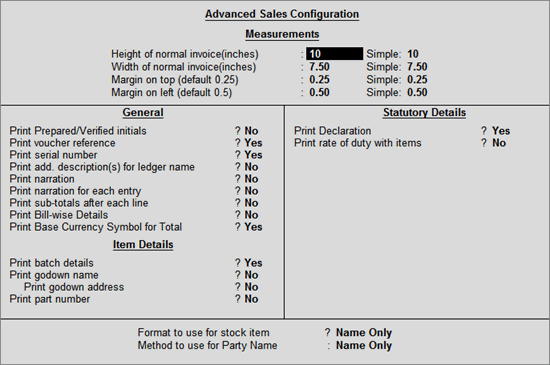
Print Prepared/Verified initials : This will print the prepared by and verified by name beside Authorized signatory .
